BudgetFilmmaker.co.uk
  • Home
  • Buyers Guides
  • About
  • Support
  • Disclaimer
  • Contact

i-Cuff Viewfinder Eyecup Review

6/12/2012

Comments

 
Picture
Couple of months ago i-Cuff  sent me one of their unique eyecups designed to improve the experience of using a viewfinder on camcorders or DSLRs (LCD viewfinder).

A lot of filmmakers love to use their Zacuto, CarrySpeed, LCDVF and other viewfinders on their DSLRs. Some literally don’t shoot without them.  People who use ENG style cameras only really ever use viewfinders as it’s the only way of operating the camera properly.

I don’t use viewfinders when I don’t have to, just not my thing. One time though, when I just can’t shoot without a viewfinder even now is when I shoot outside. Even on an overcast day, it helps, on a sunny day it’s literally impossible to shoot properly without one.
Picture
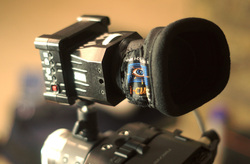
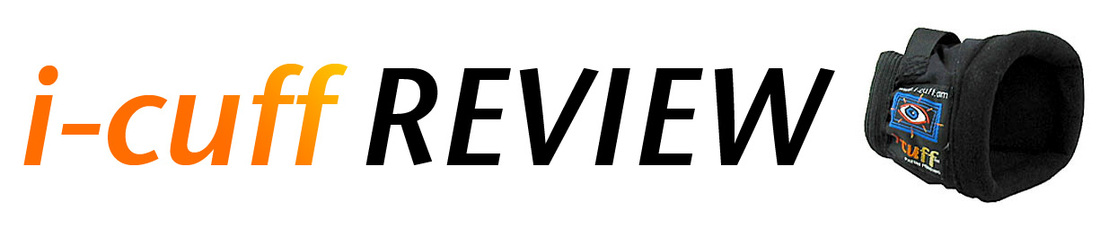
When I first received the i-cuff, I thought that is must be a bit of an unnecessary gimmick, but after using it for a couple of times, especially in a cold weather I changed my mind completely. I mostly use a cheap LCD viewfinder on my 5D and a Zacuto EVF. Both have rubber hoods/eyecups which seemed to be are ok, until I tried the i-cuff.

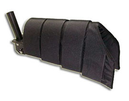
Unlike the rubber eyecups, i-cuff is made of fabric, which is washable, waterproof and works well both with and without glasses. I don’t wear glasses, but I could see how i-cuff could really improve the viewing experience. It wraps around the face much better and you don’t have to press yourself firmly against the viewfinder, which would be very uncomfortable with a common rubber eyecup. Made out breathable fabric it also reduces fogging which is also a common problem with viewfinders.

Picture
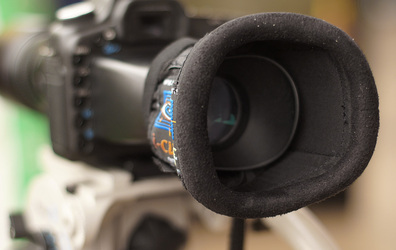
The most impressive thing for me is how i-cuff feels against my face in cold winter conditions. For comparison I first pressed my face against the rubber eyecup and then placed the i-cuff on top of it. The difference was massive, rubber gets really cold and very unpleasant in cold conditions; i-cuff though just doesn’t feel as cold, due to it’s soft fabric around the edge that touches the face. It really makes me want to use it every time I shoot outside.
Picture
 It’s one of them simple accessories that actually make a lot of difference.

i-Cuff comes in 3 sizes, DV, HD, & PRO depending on the camera you use.  The smaller one is just $29.95 and the other 2 are $45, so there is literally no excuse not to get one if use viewfinders a lot.

You can check out more info and to order one yourself visit: www.i-cuff.com


Comments

Camtree E-Slider PRO Review & First Test Footage

30/7/2012

Comments

 
The review above is quite long and detailed so there isn’t much I can add.

It’s not too short, not too long, it’s portable enough, it can be fast, it can be slow, it’s easy to use and it makes perfect sense for me.

I’ve only just stated using this slider and there are so many new possibilities that have opened up to me, so more footage shot with this slider is yet to come.

I’ve been looking for such slider for a long time now and I will definitely be keeping this one for years to come.

At this price, I don’t think there is any real competition, not to say that there won’t be in future. We are living in a great time for independent filmmakers. The quality and features keep growing and the prices keep dropping. Amazing times!

Picture
Click to Find This Item on eBay
E-Slider PRO on eBay

Comments

RJ Follow Focus with L-shaped Bracket REVIEW

11/6/2012

Comments

 
This follow focus is quite unique thanks to its flexible L shaped bracket. The only similar follow focus that I know is the D-focus, which doesn’t really offer anything more than this RJ unit. I wanted to try it just to see how it would feel and I was impressed with the size and feel of the whole setup. To me the gearbox of my particular unit is a bit disappointing, but as I said in the video, the gearbox performance varies; so some of you might have better luck with it. 

I bought mine a while ago and while I was looking up the ebay link for this write-up, I found out that this FF now comes with both L-shaped bracket and the standard 15mm rod fitting mount, which is absolutely amazing. No other FF offers you both mounting options, although the L-shaped adapter could be adapter to many other FFs. Someone should start selling them separately.

Anyway, if you’re about to buy your first follow focus and don’t yet have your 15mm rod setup, I think this FF could be the one to go for. When you decided to buy your 15mm rod system you’ll still be able to use this FFs with it, which is very cool.

If this FF is not for you, check out the Follow Focus Buyers Guide for more options.

Picture
Click to view this item on eBay


RJ Follow Focus with L-shaped Camera Bracket on eBay


Comments

Filmcity X1 Follow Focus Review

22/5/2012

Comments

 
The Filmcity X1 follow focus is currently one of the cheapest FFs you can get on eBay and just about anywhere really. I wanted to see what’s it feels like, so I bought one. I wasn’t expecting it to be the best follow focus in the world, although I always hope that the next follow focus I get will be the one. 

Well, the X1 is a nice follow focus, one that you would expect to be over £200 just a few years ago. In fact it’s virtually the same as my Camtree Follow Focus, which I bought for over £200 just about 2 years ago. It has the same marking disc, same 360 degree adjustable pointer, similar mounting system (probably both were made by the same manufacturer).  While I still prefer my good old Camtree, the X1 offers so much for such a low price. Although the gearbox has some play (similar amount to similarly priced, but simpler RJ and probably less than Fotga DP500, which another really cheap option).

The fact that you get the whip and the lens gear on top of all the cool features gives this follow focus the edge over the similarly priced units.

Although I decided not to keep mine (I don’t need more than one FF anyway), I do recommend it to people who on a really low budget or/and just buying their first follow focus.

If you think, this might not be the one for you, make sure to check out my Follow Focus Buyers Guide for more great value for money options.
Picture
Click to view this item on eBay
Filmcity X1 on eBay

Comments

FLYCAM C5 Stabilizer Review + Tips on Balancing and Achieving Best Results

1/4/2012

Comments

 
Picture
I absolutely love the flowing, beautiful and engaging steadicam (stabilizer) shots often seen in films and music videos. When done properly they can add so much production value to any video production, be it a creative one or even a corporate video.  One of the first things I bought then I first got into filmmaking was a Flycam 5000, which was a great start for me. Even though it’s very tired now, in my time using it, I produced a lot great shots with it, that really helped me bring the projects that I was working on to life.

Quite recently I decided it’s time to upgrade to something better and very conveniently for me a new version of Flycam just came out, which on paper offered much more for the price I originally paid for 5000.  I didn’t want to spend much and at this price there wasn’t anything else that really stood out.

I week later I received my new Flycam C5 and made an unboxing video right away, which can be viewed below if you haven’t seen it yet.
I went through the features in the video, but the ones that stood out to me again while actually using this stabilizer were:

Top plate fine adjustment knobs: These things are so straightforward and so good for precise adjustment.  Adjusting side to side and back to front balance is so easy. There are 2 side-to-side fine adjustment knobs on each side, so no matter what hand you are holding you stabilizer with, you can reach the knobs easily. On top of that, you don’t have to undo any safety knobs/screws to adjust the side-to-side balance, unlike all the other stabilizers I’ve used.  You would usually have to undo 4 knobs on the bottom to adjust the side-to-side balance; with C5 you just rotate 1 knob and when you are happy, you just leave it as it is, it the plate doesn’t slide or rattle about.

Back to front adjustment is also much more straightforward that on any other stabilizers I’ve seen. You only have to undo one knob to loosen the top sliding plate and then rotate the fine adjustment knob to move the plate back and forth. The older/simpler models like Flycam 5000 & Nano and Glidecam Pro series, don’t even have any fine adjustment knobs, you have to adjust the balance by moving the plate with your hands, not great for fine balance adjustment and impossible to do while holding the stabilizer with your other hand to check the balance. The closest thing in terms of comfortable, precise adjustment with similar specs is the Glidecam HD4000, but even with that one you have to undo 8 knobs in total to adjust side to side and back to forth balance and on top of that it also costs almost 3 times more than the C5. Talking about more expensive stabilizers, I’m sure there are probably a lot of higher-end stabilizers that offer such straightforward balance adjustment methods, but they are way too expensive to fit into budget/indie filmmaking bracket that I’m talking about here. At this or similar price there is really nothing out there that offers the features mentioned above, unless I’m missing something.

Sliding Plate: This plate is like a tripod plate rather than one of them massive plates found on other stabilizers mentioned above. With these stabilizers people just end up buying extra quick release adapters to avoid unscrewing all 4 or in case of Glidecam HD series 8 side screws/knobs to get the top plate off just to put the camera on and do the same when the want to get it off. This is incredibly annoying and inconvenient. So one of the things that initially impressed on C5, was this cool, sliding, quick release plate; just one knob to undo and it slides out just like a tripod plate. There is a safety pin too, to make sure that it doesn’t fall out, protecting your camera from a potentially painful drop.  This plate is a really cool idea, I think it probably was inspired by higher-end stabilizers, because I’ve only seen such plates on higher-end Glidecams and Stedicams which cost at least 10 times more than C5. It’s great that Flycam is catching up higher-end technology and offers such cool features at such a low price. It’s really not a computer science, but simple things that could improve any stabilizer. I don’t know why other companies don’t offer such features on their stabilizers. Maybe it’s a part of protecting their top of the line products, otherwise why would someone pay $$$$/££££ for the features that can be found on an entry-level model.

A few other things that stood out to me are:

The carbon fiber central post. I’m not sure how much lighter is it than the aluminum post, but it looks quite cool and adds to the overall positive feel.

The poll extension knob is also really nice, much more comfortable than one on my Flycam 5000. It’s ratchet too, very good for moving it out of the way once it’s tightened.  

When assembled and fully extended, the C5 is quite a large stabilizer, capable of handling a camera up to 7.5lb/3.4kg, which means it could handle much larger cameras than just a DSLR, like my 5D,  but when dissembled it very neatly fits into a very compact, padded bag that comes with it. This is a big bonus for me, because my stuff usually gets all scratched up in my big suitcase. The bag has a shoulder strap for transportation, but even if I just drop it into the suitcase with my tripods and stands, it’s protected and basically stabilizer will last longer. If I decide to sell it in future, it will hold value better, unlike my Flycam 5000, which is now so tired, I don’t even want to put it on eBay.

So is it a perfect stabilizer? Nothing is perfect and of course there are always things that can be improved. I find that the handle is a bit short for my hand and why no foam or rubber padding? It’s simply metal, which I guess was also inspired by handles on high-end stabilizers, which are usually used with swing-arms and vests; there is no need for padding on such stabilizer handles. To be honest, when I’m using the C5 with my arm brace it doesn’t bother me either, but for people who would just hold the stabilizer with their wrist, some padding would be nice, which would also make the handle chunkier and bigger, which would help holding it for a longer period of time. Adding some padding is very simple, even I could do that, but it’s nice to have what you need when you buy something, not mod it afterwards.
Picture
The only other thing that is a bit annoying is that the holes on the quick release plate are of different sizes, 3 smaller and 2 larger. The larger ones are almost too large for the screws that come with the stabilizer, if you’re not careful when fitting the camera the crew could fall through. This could be very easily fixed if they would include slightly larger washers. For now, to I’ll just to get a larger washer or a screw with a larger head (the spare ones from my Giottos MH621 adapter should be just fine). I could just use one of smaller holes, but I find the second hole from the back is the best for a DSLR setup; it happens to be the larger one. For other cameras it might be different, quite possibly the middle one which is one of the smaller ones.

Below you can see some test footage that I shot with this stabilizer.

I think for a first time it performed really well, but I could achieve better results with some practice. To get the most out of any tool, be it a slider, tripod, dolly or stabilizer, you need to practice. I’ve heard someone say that a good steadicam operator could take a stick and make better shots than someone with a high-end stabilizer who doesn’t how to use it. I have to agree with that.  I’m not really good at it myself, but I’m willing to learn, practice and get better. If you’ve never used a stabilizer yourself and about to get one, be it a C5 or any other one, don’t be disappointed if your first try is not great. Experiment with the balancing until you get it right. It initially took me about 15-20 minutes to get the balance I wanted, so don’t assume that you can stick the camera on a stabilizer and magic will happen, when you first get into to it, things might not go your way, but just work on it, get the balance as good as you can and most importantly, practice.  Bellow you can see the video I’ve done on balancing a stabilizer and getting the best results out of it.  Hope it will be helpful if you are only starting out or want get more out of your stabilizer.
Going back to the review. I’m really enjoying my Flycam C5. It looks cool and it feels great too.  At this price, I really don’t think there is anything better. Most of the stuff out there is a bit basic and dated. The C5 is probably one of the newest budget stabilizers available and as mentioned above, it seems to be inspired by the higher-end stuff, bringing some cool features to people on a tight budget like myself. Of course it’s not the best stabilizer in the world, but it offers an amazing value/features for money. I highly recommend the C5 to anyone looking to buy their first Stabilizer or upgrading from something like a Flycam 5000 or Nano. I also recommend buying an arm brace. It doesn’t cost much and it helps so much with operation, especially for a longer period of time or with a heavier camera.

It ended up to be quite a lengthy review and I hope you stuck with me till the end. Feel free to ask any questions regarding this or any other stabilizer and I’ll do my best to get back to you soon.

Picture
Flycam C5 Stabilizer on eBay

Picture
Stabilizer Arm Brace on eBay

Comments

Samyang 35mm f/1.4 Review & Test Footage.

14/2/2012

Comments

 
As you can see above, I love absolutely love this lens and highly recommend it, no matter what interchangeable lens camera use use. It's not incredibly cheap, but it offers a great value for money, comparing to the similar alternatives from the high-end companies.

My lens is a de-clicked, but not one of the new CINE version, which have the fluid aperture adjustment as standard. This feature is absolutely amazing for video work. The standard version one has a clickable aperture adjustment and you would have to get it de-clicked to achieve the fluid adjustment.

By the way the footage of the lens in the video above was shot with a lovely little Sony NEX 5N, which I now constantly use as my slow mo and b camera. Used it with the Samyang too, work great!.


Picture
Samyang 35mm f/1.4  (where to buy in UK)
Samyang 35mm f/1.4 (on Amazon.com)

Comments

Lens De-Clicking & Mount Conversion by UK eBay shop

21/11/2011

Comments

 
Lately I’ve been buying up a lot of cheap vintage photo lenses on eBay for my “Vintage Lenses for Video DSLRs” guide I’m currently working on.  By now, I discovered some many business sellers selling vintage lenses, but one of them stood out to me much more than the others, so I wanted to share this with everyone because it might be very useful to some of you. Before I go further, I just want to make it clear that I don’t know the seller personally and not trying to promote anyone’s business, I just think it is something unique, especially if you’re based in UK and as really worth sharing.
Picture
The eBay seller eddiehouston1545 has the eBay shop called The Lens Doctors. Unlike most sellers/shops, what sell vintage lenses, Eddie who runs the shop services all of the lenses he sales. While they are not the cheapest on eBay, all of them seem to be in such a wonderful condition. From reading the listings and shop info, you can tell that Eddie knows what he’s doing and a lot of work is spent on every listing and every lens sold.  While buying a serviced lens, which looks and works like new is very nice, it’s not the servicing that got my attention, but the aperture de-clicking and mount conversion of some lenses sold by Eddie.

If some of you don’t know what de-clicking is, let me explain. Most of older manual lenses have aperture adjustment on the lens, which is controlled by turning the aperture ring. Most of the rings have click stops, so there is a click with every change of aperture. Through the camera it looks pretty much the same as adjusting aperture with Canon EF lenses by turning the dial on the camera. If you adjust the aperture during the recording the image very suddenly brightens or darkens, depending on what your doing. Cine lenses on other hand have variable aperture adjustment, which means the aperture ring can be turned with the same smoothness as the focus ring, giving a very gradual aperture control, which can very useful in al lot of situations.  Let’s take a scenario where you are filming something indoors at the start of the take and then go outside into the bright daylight during the take. The image will overexpose as soon as you go outside. If you are like myself, filming on DSLR with fully manual control, you will be forced to adjust either the aperture, ISO or in worst case scenario your shutter speed. Any of the changes will result in image suddenly changing in unpleasant looking steps, rather than gradually. With variable adjustment one could avoid such situation by turning the ring slowly, gradually reducing the brightness without any “steps”.  I have the Samyang 35mm lens, that has smooth aperture adjustment (video version from ebay) and I do love it so much, it is such a nice way to fine-tune the aperture to your particular requirements, so the possibility of having such aperture on any vintage lens, sounds very appealing.

Eddie from The Lens Doctors sells some very cool lenses with such modification. He calls it Fluid Variable Aperture. Since I don’t think there is anyone else in UK  does that professionally, I assume it takes a very skilled technician to do that. He has 30 years of experience servicing and repairing lenses, so I think he knows what he’s doing and does it really well. A massive 5 star/100% feedback proves that dealing with Eddie must be a pleasure.

Some of the de-clicked lenses that are on sale at the time of writing are:

Picture
Mayer Orestegon 29mm f/2.8. Not only this lens has the variable aperture adjustment, but it’s also converted to EF mount with electronic focus confirm chip which takes advantage of focus confirmation function on a Canon DSLR. 

Picture
Tokina AT-X 24-40 f/2.8. Same features as above with  loads of lens history written in the listing. Viewing Eddies listings is actually a great way to learn about the cool, rare lenses and different manufacturers. Considering that Eddie used to be a Technical Manager for Canon UK, I think he knows what he’s talking about.

Picture
Vivitar 135mm f/2.8. Again modified to Canon EF mount with a focus confirmation chip, but this one is without Variable Aperture Adjustment. According to Eddie,  it’s one of the best 135mm lenses over. I already bought a few cheap 135mm lenses, would be so great to compare it to mine.

Picture
Tokina AT-X 80-200 f/2.8. Canon EF mount, lovely looking lens. A lot of people like to use Canon’s 70-200mm f/2.8 EF L lens for the video work and this lens looks like an amassing and relatively cheap alternative. That is the thing about the lenses found on thelensdoctors; they don’t seem cheap at the first instance, but when you find out more about them, they become a very tempting options. I certainly would have bought some of these lenses if I didn’t have to many already.            

There is a bunch of other really cool lenses currently on sale at thelensdoctors, most converted to EF mount and some with Fluid Variable Aperture installed.

These are really worth looking at if you are looking to buy some lenses for your Canon DSLR.  There are some real gems out there and in fact they worked out much cheaper than the same modern lenses.

If your like myself already have some vintage lenses, that are not in perfect condition or don’t fit your current camera, like Canon FDs that don’t Canon DSLRs, then Eddie can service, convert them to EF mount and even install the Fluid Variable Aperture, making your lenses as cool as the once he sales himself.  I just picked up a Zeiss lens, that might be worth investing some money into, so I’ll contact Eddie to see how much it will cost to give it this star treatment; hopefully will give me a discount for such a nice article :D

Otherwise I will certainly keep a studying Eddies lenses for to expand my knowledge of great vintage lenses.

Thelensdoctors is one of the coolest eBay shops I’ve found so far and will definitely go to my favorites list.

Comments

TRUSMT T2 FOLLOW FOCUS REVIEW

12/11/2011

Comments

 
Very cool Follow Focus, with plenty of features. A lot of people are interested in exact amount of play on FFs and while my unit has some play (1-2mm), it's dampened rather than loose play you'll find in some other FFs, so it actually fills quite nice to operate. I'm sure Trusmt were not happy with this amount of play and T2 is no longer available for sale and has been upgraded to NF2, which is essentially the same FF, but with a new gearbox, which Trusmt claims has less than 0.5mm play, which would be a great improvement. I personally haven't tried the new one, but I have some of other Trusmt products (also reviewed on the website) and overall quality of products makes be believe that the new NF2 could be one of the best FFs around £250 mark. Definitely worth checking out.
Picture
Click to view this item on eBay
Trusmt NF2 on eBay

Comments

Trusmt D100MB2-CF Matte Box Review

10/11/2011

Comments

 
This is one really cool matte box. I really don't think there is anything better value for money out there for under £300/$500. It's still not the same as high end MBs costing £1000 and more, but for the money you do get plenty of features, including a swing-away arm, 2 rotating 4x4 filter holders, carbon fiber flags, so really nice MB. Will soon do a round up of all best MBs availible on eBay, so will be able to tell how the price will fair up against the competitors.For now, I Highly Recommend it to anyone currently looking to buy a matte box.

Picture
Click to view this item on Ebay
Trusmt D100MB2 Matte Box on eBay

Comments

CAMTREE 600 LED VIDEO LIGHT REVIEW

15/10/2011

Comments


Camtree 600 LEDs were one of the cheapest around when I originally bought them and I have to say, they are great value for money, especially if you compare their price to LEDs from some top brands. I’m not saying the high end LEDs are bad or that they are bad value for money, but for a Budget Filmmaker like myself, they are simply pout of reach. 

Now that I used my LEDs on couple of shoots I can go through a few more points not covered in original review.

Recently I shot a music video mostly just using these lights with a 1k generator. What is so good about such lights is the incredibly low power consumption. According to specs it only draws 30W maximum with luminous efficiency equivalent to 500W tungsten light, which is absolutely incredible. I was able to use this very nice compact generator (of course bough on eBay) to power 2 of these light + 2 small fluorescent lights and they were barely drawing any power at all. I was getting 1000W of light while only drawing 60W form a generator. Imagine how many lights you could use with just this small 1K Generator.  If I was using the common tungsten lights with this generator, the best I could get out of it would be 800w from a redhead, or 1K at very best. I’ve worked out how much I power I could potentially get out of LEDs drawing up to 1K from a generator. According to simple calculations, I could power 33 x 600LED lights, giving me 16.5K of light!!!! Crazy amount of light and somehow I just don’t believe 1K generator would hold up, although theoretically it should.  Even then, it should easily handle 10x600LED lights still giving 5K of power, so if you are in situation where you have a limited amount of power, of just investing into your own lighting and possibly a portable power source, LEDs and a small generator could be much cheaper, lighter, more portable and cheaper solution than using common tungsten lights which require loads of power, excluding a lightweight power source like a 1K generator.

Now couple of bad points I picked up about these and maybe a lot of similar LEDs, (all seem to be produced in the same way). The power cord/cable is too short when light is fully extended and the power adapter is left dangling in the air, weighting the cable down putting a lot of pressure at the point when you plug in the cable into the light. The socket on the light is not designed for heavy use and when moving the lights about cable quite easily pops out, which can be very annoying.  Two solutions to this problem are: plug in the cable and put tape around socket (not very secure), second is to tape the power adapter to the stand, so there pressure to the power socket on the actual light, the power adapter takes all the pulling around which is fine, because it has much better, heavy duty 3 pin plug connection. As I said, cables are too short, so each light needs it’s own extension cord to use properly. I think similar problems will be found in most budget LED lights, because most seem to be designed  in the same way.

As you can see in the video, my LEDs don’t have any barn doors, which is a shame, I miss them and would love to have them. At the time when I bought mine, Camtree were only making them without barn doors. Now all of them have barn doors, so you will not have such problem.

I do recommend these lights, a kit of 2 is a good start, although I’m already looking at possibility of buying a third one, so I’m currently doing a lot of research on different LEDs currently available.

I will be posting a big article soon, covering all the best choices currently available on eBay, so if you are thinking of investing into LEDs, make sure to check back soon


Picture
Click to view this item on eBay
Camtree 600 LED Lights on eBay

Comments
<<Previous
    Picture
    Click to view Follow Focus Guide
    Picture
    Click to view the Matte Box Guide
    Picture
    Click to view BF's BIG LED GUIDE

    Categories

    All
    Announcements
    Background
    Buyer
    Buyers Guide
    Camera
    Canon
    Competition
    Dolly
    Dslr
    Ebay
    Ebay Auction Bargains
    Follow Focus
    General
    Gini
    How To
    Jag35
    Lanparte
    Led
    Lens
    Lenses
    Lens Giveaway
    Lens Guide
    Lens Test
    Lights
    Matte Box
    Monitors
    Nikon
    Red
    Review
    Reviews
    Slider
    Sony
    Stabilizers
    Steadicam
    Test
    Trusmt
    Tutorial
    Viewfinder
    Vintage Lenses
    Vintage Video


     Ads:

    RSS Feed


    Goodle Ads
Powered by Create your own unique website with customizable templates.
  • Home
  • Buyers Guides
  • About
  • Support
  • Disclaimer
  • Contact